Static Website with Nginx and Docker
Having just graduated, I wasn’t quite sure where to start showcasing my work. While taking my Data Science SQL course, I followed @amigoscode tutorials alongside the class and found him to be an excellent instructor. I had bookedmarked Nelson's and Nana's Docker and Kubernetes – Full Course for Beginners a while back and finally had the time to finish watching it. Now was the perfect time to dive into containerization and build a personal website. I used a Bootstrap template to streamline the development process.
I built and deployed a static webpage using Nginx as the web server. The official Nginx Docker image documentation is a great reference for creating and customizing configurations. Nginx functions as a reverse proxy and web server that supports HTTP, HTTPS, SMTP, POP3, and IMAP protocols, while also providing caching capabilitie.
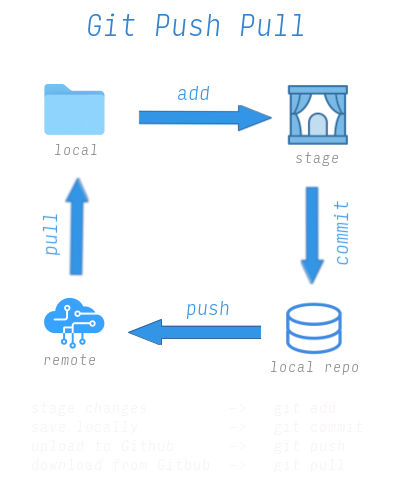
This is more of my personal overview of running a setup than an actual tutorial. Below is an overview of the basic git commands. It seems scary at first, but once you have done it a number of times, it becomes a breeze.
Exposing Port
I then exposed my directory contents to an external port and opened my browser to http://localhost:8000. Name your container custom_name and the
image some-image.
# create Docker image
docker run --name custom_name -d -p 8000:80 some-image
Enter Container Shell
If you want to view your directory inside your container, the docker exec commands allows entry using sh.
# enter Docker interactive mode
docker exec -it some-image-nginx sh

# Docker root
ls -al
cd usr/share/nginx/html
Commit and Push
I used Github Pages to publish my static webpage. After setting up my SSH key, I was able to commit and push changes directly from my local directory to Github.
# Commit and push to main or master
git add .
git commit -m “description”
git push -u origin main
The above is a simplistic overview, but in reality it took about a week of of playing with Docker and Git commands. CSS and HTML editing took another week, though the Bootstrap documentation and web searches facilitated this. I used ChatGP intermittently, but it just turned out be a huge disaster. I don't always find it reliable and gives you word salad. At one point, I contemplated creating a Next.js or Flask app with postgres for the Contact Me page, but opted to use formspree.io as I just needed to get the website up and running. That could be for a future post. I also created a .gitignore file to keep unnecessary files out of version control as I continue building new projects.
Overall, this was a great foundational project to start with. I’ve worked with Docker before, but only at a surface level. Being an Arch user, I’m comfortable working from the terminal, but my Neovim workflow improved significantly throughout this project. I did get sidetracked starting another project before circling back to complete this one. There were plenty of headaches along the way trying to get everything fully implemented, but that’s the whole point of building projects—you learn the most by troubleshooting when things go wrong.
Thanks for reading if you made it this far! Click here for the initial version of my blog.